
LOVE Notes Container

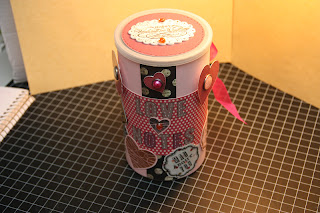
Happy Wednesday, everyone! I wanted to share a Valentine project that I made for Sheila's wonderful blog : SHE'S A SASSY LADY a few weeks back!  This Love Notes Container is perfect for tucking little love notes in - for that special someone or everyone in your house! :-)  Here is the finished container. I used the fabulous papers and embellishments in the February kit from CLUB RUBY DESIGNERS . (As a side note, Club Ruby Designers as we know it right now will be ending so head over there to take advantage of a great sale on past kits! Don't worry, bigger and better things are on the way!!)

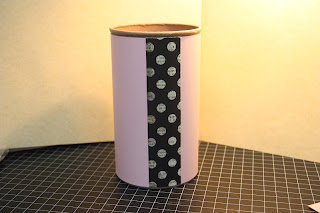
I started with an 18oz. empty oatmeal container.

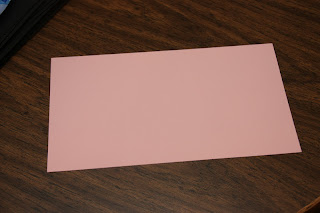
Cut a 6 5/8"x12" piece of pink card stock.

Wrap around the container and adhere. There will be a small gap but we'll be covering that up next.

Cut a 1 1/2"x6 3/4" strip of black dot paper to adhere and cover the gap. This will be the front.

Cut another strip from the same paper measuring 2 1/2"x6 3/4" and adhere it on the opposite side of where the previous strip was placed. 

Here I tried to show how the two strips are positioned opposite of each other.

Cut a 3 1/4"x9" strip of white dot paper - use a border punch on both ends before adhering centered over  the smaller strip that is on the front.


Thread some ribbon through holes made with the border punch and tie a bow.


Adhere sticker letters to spell "LOVE NOTES" centered on front. Outline with black gel pen to define them. Add some stitching with a white gel pen.

Using the Art Philosophy cartridge, cut various shapes and stamp with the "Mad About You" stamp set from CTMH.  I put brads from the CRD kit in 3 of the shapes. 

Cut a 3 1/2" circle - (I used George and Basic Shapes) - to put on the lid. I cut it out of pink glitter paper.

Cut a 2" scalloped rectangle from Art Philosophy to mount on the matching chipboard shape in the CTMH bundle.  Stamp Happy Valentine's Day and adhere two gems from the kit. Embellish with a black gel pen.

Mount label on the lid and do some stitching with a black gel pen.


Add embellishments! I used pop dots for some of them.


Thanks for stopping by and remember to make time to make something beautiful today! :-)


Comments

Michelle said…
This is adorable! I LOVE to alter things as well!! Welcome to CWC DT. I look forward to getting to know you better and have fun crafting with you! Also, I am happy to hear you have been cancer free for 9 years!! When I came on board I was recovering from Thyroid cancer. :)

Hugs,
Michelle

Popular posts from this blog

Be My Valentine Blog Hop

Hello everyone and welcome to the "Be My Valentine" blog hop!! This is the first blog hop that I have had the opportunity to participate in and I've had so much fun!   If you arrived here from  Macy Bella Designs  then you're on the right track. If not or if you have missed a few blogs along the way, be sure to go to the beginning at  Creations With Kathryn  so you can see all of the great Valentine projects today!! There are even some blogs that have blog candy - (like ME!)  After you check out my project, your next stop will be  Crafty Baskets  . Now, on to my project!! I made a box to put a set of Valentine's cards in. I used a 12x12 piece of double-sided cardstock from K and Co. The cards are made with Kraft paper and are a 4x4 size. I used the Cricut Sentimentals cartridge for the postage stamp cut on the front of each card and used my Gypsy to cut them so I could unlink the H and W so it would be 3.75" square. The valentine cuts for the front of the ca

Think Spring Blog Hop

                                Welcome to the THINK SPRING BLOG HOP!!  You should have arrived here from the amazingly talented  Crafty Baskets  !  If you just happened upon my blog, be sure to go back to the beginning at  Creations With Kathryn  . She is our wonderful host for this hop!  On to my project: I decided to make a Spring mini album to showcase a few pictures that I took at the Zilker Botanical Gardens in Austin, TX.  What is more telling of Spring than flowers?!   I used the Card/Tag feature on the Paisley Cricut cartridge and used paper from the DCWV Spring cardstack. (I think this stack was from last year or maybe even the year before! :-) I'm just finally using it! )  The paper flowers throughout are from the 3 Birds Pretty Petals collection.  Read to the end of this post to find the link for the next blog to hop to and for my blog candy! This is a pic of an open page. Now for my blog candy!!  Just leave me a comment on this post with a way to contact you -

My Pink Stamper Challenge

My Pink Stamper has posted a challenge today to any and all who would like a shot at being on her design team! My project needed to use a favorite Cricut cartridge and the colors: pink, green and brown and another color of my choice. I used my Creative Memories Cheerful Seasons cartridge and my Imagine with the Mr. Frosty pattern cartridge and Snapshot Everyday cartridges. I am going to frame this project so I can always look at my sweet little, brand-new grandson!! The mat behind this adorable picture was printed and cut on my Imagine from the standard shapes on the Imagine and the Mr. Frosty cartridge. I really like this snowflake pattern! This is a close-up of the tree and layers from page 60 of my Creative Memories Cheerful Seasons Cricut cartridge and was cut at 3.5"H. I used Star Dust Stickles to make the "snow" on the tree look like it was glistening! Notice the "wood" paper for the tree trunk - this is a texture pattern on the Snapshot Everyday Imagine