
Totally Tags 'N ATC's at My Papercrafting World

Today is another fun tag and ATC challenge day over at MY PAPERCRAFTING WORLD! This week we are challenged to use Purple - (like that is a real challenge??) :-)  I used the Picturesque Cricut cartridge to create my tag this week:


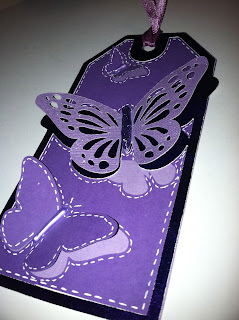
This is the butterfly tag cut at 3.24". The very bottom layer is cut using the Hide/contour feature on my Gypsy so it will be a solid layer.  The largest butterfly was a separate cut and I sized it at 2.06" and it fits perfectly even though it is not "technically" a layer on this tag. Pretty cool, huh? :-)

This is how all the layers look before assembly.


Some close-ups. I simply added the cut-outs over the top of where they were cut out! I just put adhesive down the middle of each butterfly so I could bend the wings up for added dimension! I just love how it turned out! Hope you all do too!  Make sure to stop over at MY PAPERCRAFTING WORLD to check out all the other beautiful purple tags and to play along by making your own tag! HAPPY SPRING! 


Comments

Sandy Palmer said…
Sweet tag! Love how you popped the butterflies! Nice touch with the faux stitching! :)
Brenda said…
Love this tag Jen! I also love how you showed all your layers before putting them together-this tag is so cool! Love the butterflies and of course the purple challenge. lol
Lynden Blossom said…
Lovely Tag! I love using the 'negative' cuts for things, too! The faux-stitching, also! ;-}
Lynden
http://aneleganttouch-lynden.blogspot.com
https://www.facebook.com/pages/An-Elegant-Touch-/162889457132788
Love the layers on this. Having the shadow pieces gives the butterflies so much more dimension. Thanks for showing all the pieces laid out too.
The faux stitching really added alot of pop too. Thanks for being part of the Tag N' ATG hop.

Popular posts from this blog

Be My Valentine Blog Hop

Hello everyone and welcome to the "Be My Valentine" blog hop!! This is the first blog hop that I have had the opportunity to participate in and I've had so much fun!   If you arrived here from  Macy Bella Designs  then you're on the right track. If not or if you have missed a few blogs along the way, be sure to go to the beginning at  Creations With Kathryn  so you can see all of the great Valentine projects today!! There are even some blogs that have blog candy - (like ME!)  After you check out my project, your next stop will be  Crafty Baskets  . Now, on to my project!! I made a box to put a set of Valentine's cards in. I used a 12x12 piece of double-sided cardstock from K and Co. The cards are made with Kraft paper and are a 4x4 size. I used the Cricut Sentimentals cartridge for the postage stamp cut on the front of each card and used my Gypsy to cut them so I could unlink the H and W so it would be 3.75" square. The valentine cuts for the front of the ca

Think Spring Blog Hop

                                Welcome to the THINK SPRING BLOG HOP!!  You should have arrived here from the amazingly talented  Crafty Baskets  !  If you just happened upon my blog, be sure to go back to the beginning at  Creations With Kathryn  . She is our wonderful host for this hop!  On to my project: I decided to make a Spring mini album to showcase a few pictures that I took at the Zilker Botanical Gardens in Austin, TX.  What is more telling of Spring than flowers?!   I used the Card/Tag feature on the Paisley Cricut cartridge and used paper from the DCWV Spring cardstack. (I think this stack was from last year or maybe even the year before! :-) I'm just finally using it! )  The paper flowers throughout are from the 3 Birds Pretty Petals collection.  Read to the end of this post to find the link for the next blog to hop to and for my blog candy! This is a pic of an open page. Now for my blog candy!!  Just leave me a comment on this post with a way to contact you -

My Pink Stamper Challenge

My Pink Stamper has posted a challenge today to any and all who would like a shot at being on her design team! My project needed to use a favorite Cricut cartridge and the colors: pink, green and brown and another color of my choice. I used my Creative Memories Cheerful Seasons cartridge and my Imagine with the Mr. Frosty pattern cartridge and Snapshot Everyday cartridges. I am going to frame this project so I can always look at my sweet little, brand-new grandson!! The mat behind this adorable picture was printed and cut on my Imagine from the standard shapes on the Imagine and the Mr. Frosty cartridge. I really like this snowflake pattern! This is a close-up of the tree and layers from page 60 of my Creative Memories Cheerful Seasons Cricut cartridge and was cut at 3.5"H. I used Star Dust Stickles to make the "snow" on the tree look like it was glistening! Notice the "wood" paper for the tree trunk - this is a texture pattern on the Snapshot Everyday Imagine