
Baby Shower Banner and Centerpiece

Hello everyone! So excited to share here and over at SHE'S A SASSY LADY today! We had a diaper drop baby shower for my daughter-in-law over the weekend so I just had to try out my newest cartridge from Creative Memories - Tiny Treasures! This is an awesome cartridge and if you don't already have a CM consultant, feel free to stop by my website ------> HERE  to order this or any of our other amazing cartridges!


Here are pics of my finished projects and then I'll give more details. I used the Cricut Craft Room to cut everything! I usually use my Gypsy but they haven't added Tiny Treasures in an update yet! I'm actually glad, though, because this is the first big project I've done in the Cricut Craft Room and I really loved it! Just as easy as my Gypsy, but a bigger screen! Yay! For anyone who wants it, I have included the Cricut Craft Room file at the end of this post for your personal use. When the Gypsy is updated, I will update this post with the Gypsy file.


Some close-ups:
hanging star, cut at 8.028" - pg. 57 of handbook
banner with letter cutouts are located throughout the handbook and were cut at 6.014"


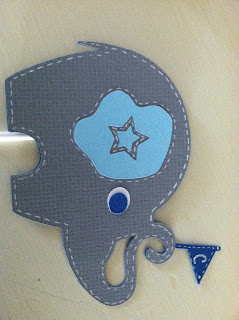
Sorry, I didn't get this pic rotated! The elephant is on pg. 32 and was cut at 4.028".

This adorable duck is on pg. 36 and was cut at 5".

This tag is just too cute and is on pg. 67 and was cut at 4.278".

This sweet giraffe is on pg. 33 and was cut at 6.375".

"It's a Boy!" is on pg. 70 and was cut at 4.292".

There are so many possibilities for this cartridge! To make the centerpiece I simply cut out these images  and taped them to lollipop sticks and stuck them in foam blocks that you can find in the floral department. If you don't have lollipop sticks you can also use wood skewers. The banner is hung on twine using mini clothespins. I love how the clothespins add some extra dimension!

Thanks for stopping by today and remember, you can visit my website------> HERE to purchase this awesome cartridge! 

Here is the free Cricut Craft Room file:


Comments

Charlotte C said…
You did a great job on these decorations. I tried to post a comment on Sheila's blog, but the comment section wouldn't open. Haven't seen this cartridge before, but it looks like something I'll be thinking about getting.
Beautiful baby shower. That looks like a great cartridge. Love the font too.
JeanneLee said…
Jen, everything turned out just adorable...love the colors you used!
cdm317 said…
I love your decorations! Everything looked perfect!
benilhalk said…
Oh my goodness, I just loved the baby shower banner and centerpiece ideas a lot. It was a complete stunner post because I also would be hosting the baby shower for my cousin and would be hosting the chic bash for my cousin at the local convention center. I will surely be using these ideas for this bash.

Popular posts from this blog

Be My Valentine Blog Hop

Hello everyone and welcome to the "Be My Valentine" blog hop!! This is the first blog hop that I have had the opportunity to participate in and I've had so much fun!   If you arrived here from  Macy Bella Designs  then you're on the right track. If not or if you have missed a few blogs along the way, be sure to go to the beginning at  Creations With Kathryn  so you can see all of the great Valentine projects today!! There are even some blogs that have blog candy - (like ME!)  After you check out my project, your next stop will be  Crafty Baskets  . Now, on to my project!! I made a box to put a set of Valentine's cards in. I used a 12x12 piece of double-sided cardstock from K and Co. The cards are made with Kraft paper and are a 4x4 size. I used the Cricut Sentimentals cartridge for the postage stamp cut on the front of each card and used my Gypsy to cut them so I could unlink the H and W so it would be 3.75" square. The valentine cuts for the front of the ca

Think Spring Blog Hop

                                Welcome to the THINK SPRING BLOG HOP!!  You should have arrived here from the amazingly talented  Crafty Baskets  !  If you just happened upon my blog, be sure to go back to the beginning at  Creations With Kathryn  . She is our wonderful host for this hop!  On to my project: I decided to make a Spring mini album to showcase a few pictures that I took at the Zilker Botanical Gardens in Austin, TX.  What is more telling of Spring than flowers?!   I used the Card/Tag feature on the Paisley Cricut cartridge and used paper from the DCWV Spring cardstack. (I think this stack was from last year or maybe even the year before! :-) I'm just finally using it! )  The paper flowers throughout are from the 3 Birds Pretty Petals collection.  Read to the end of this post to find the link for the next blog to hop to and for my blog candy! This is a pic of an open page. Now for my blog candy!!  Just leave me a comment on this post with a way to contact you -

My Pink Stamper Challenge

My Pink Stamper has posted a challenge today to any and all who would like a shot at being on her design team! My project needed to use a favorite Cricut cartridge and the colors: pink, green and brown and another color of my choice. I used my Creative Memories Cheerful Seasons cartridge and my Imagine with the Mr. Frosty pattern cartridge and Snapshot Everyday cartridges. I am going to frame this project so I can always look at my sweet little, brand-new grandson!! The mat behind this adorable picture was printed and cut on my Imagine from the standard shapes on the Imagine and the Mr. Frosty cartridge. I really like this snowflake pattern! This is a close-up of the tree and layers from page 60 of my Creative Memories Cheerful Seasons Cricut cartridge and was cut at 3.5"H. I used Star Dust Stickles to make the "snow" on the tree look like it was glistening! Notice the "wood" paper for the tree trunk - this is a texture pattern on the Snapshot Everyday Imagine